Framing and Structural Components
Framing and structural components form the backbone of any construction project, making up around 22% of the test. This chapter covers the critical aspects of subfloor and wall framing, roof framing, and the integration of seismic and load requirements. It also addresses the proper installation of siding, stucco, and decks. A strong understanding of these elements is essential for ensuring the structural integrity and safety of a building. You'll gain insights into the selection and application of materials, learn to navigate code compliance, and understand the best practices for framing and constructing durable and resilient structures. Whether it’s securing the proper alignment of studs and joists or ensuring adequate support for load-bearing walls, mastering these concepts is key to successful construction execution.
Nails
In the field of construction, nails serve as the quickest and most straightforward way to connect two wooden pieces. Crafted from a variety of metals, nails come in diverse shapes and sizes, as depicted in the below figure. While most nails are steel-made, there are also those made of materials such as aluminum, brass, nickel, bronze, copper, and stainless steel. The latter is specifically used in conditions with high corrosion. Moreover, nails often come with coatings such as galvanization, bluing, or cementing to avert corrosion and augment their fastening strength. The size of a nail is signified by the penny, which was originally the cost per hundred nails. Penny size, commonly known as “d”, spans from 2 penny or 2d (1-inch long) to 60 penny or 60d (6-inches long).
Nails with a length less than 1 inch are categorised as brads, whereas those longer than 6 inches are labelled as spikes. The length of the nail is crucial as it must be embedded into the base or thicker material at least two-thirds of its length. For instance, to join a 1 X 3 board to a 4 X 4 beam, an 8 penny or 8d nail should be utilized. The 8d nail, measuring 2-1/2 inches in length, will have 3/4 inches of its length driven through the 1 X 3 board, while the rest of the 1-3/4 inches will be driven into the beam.
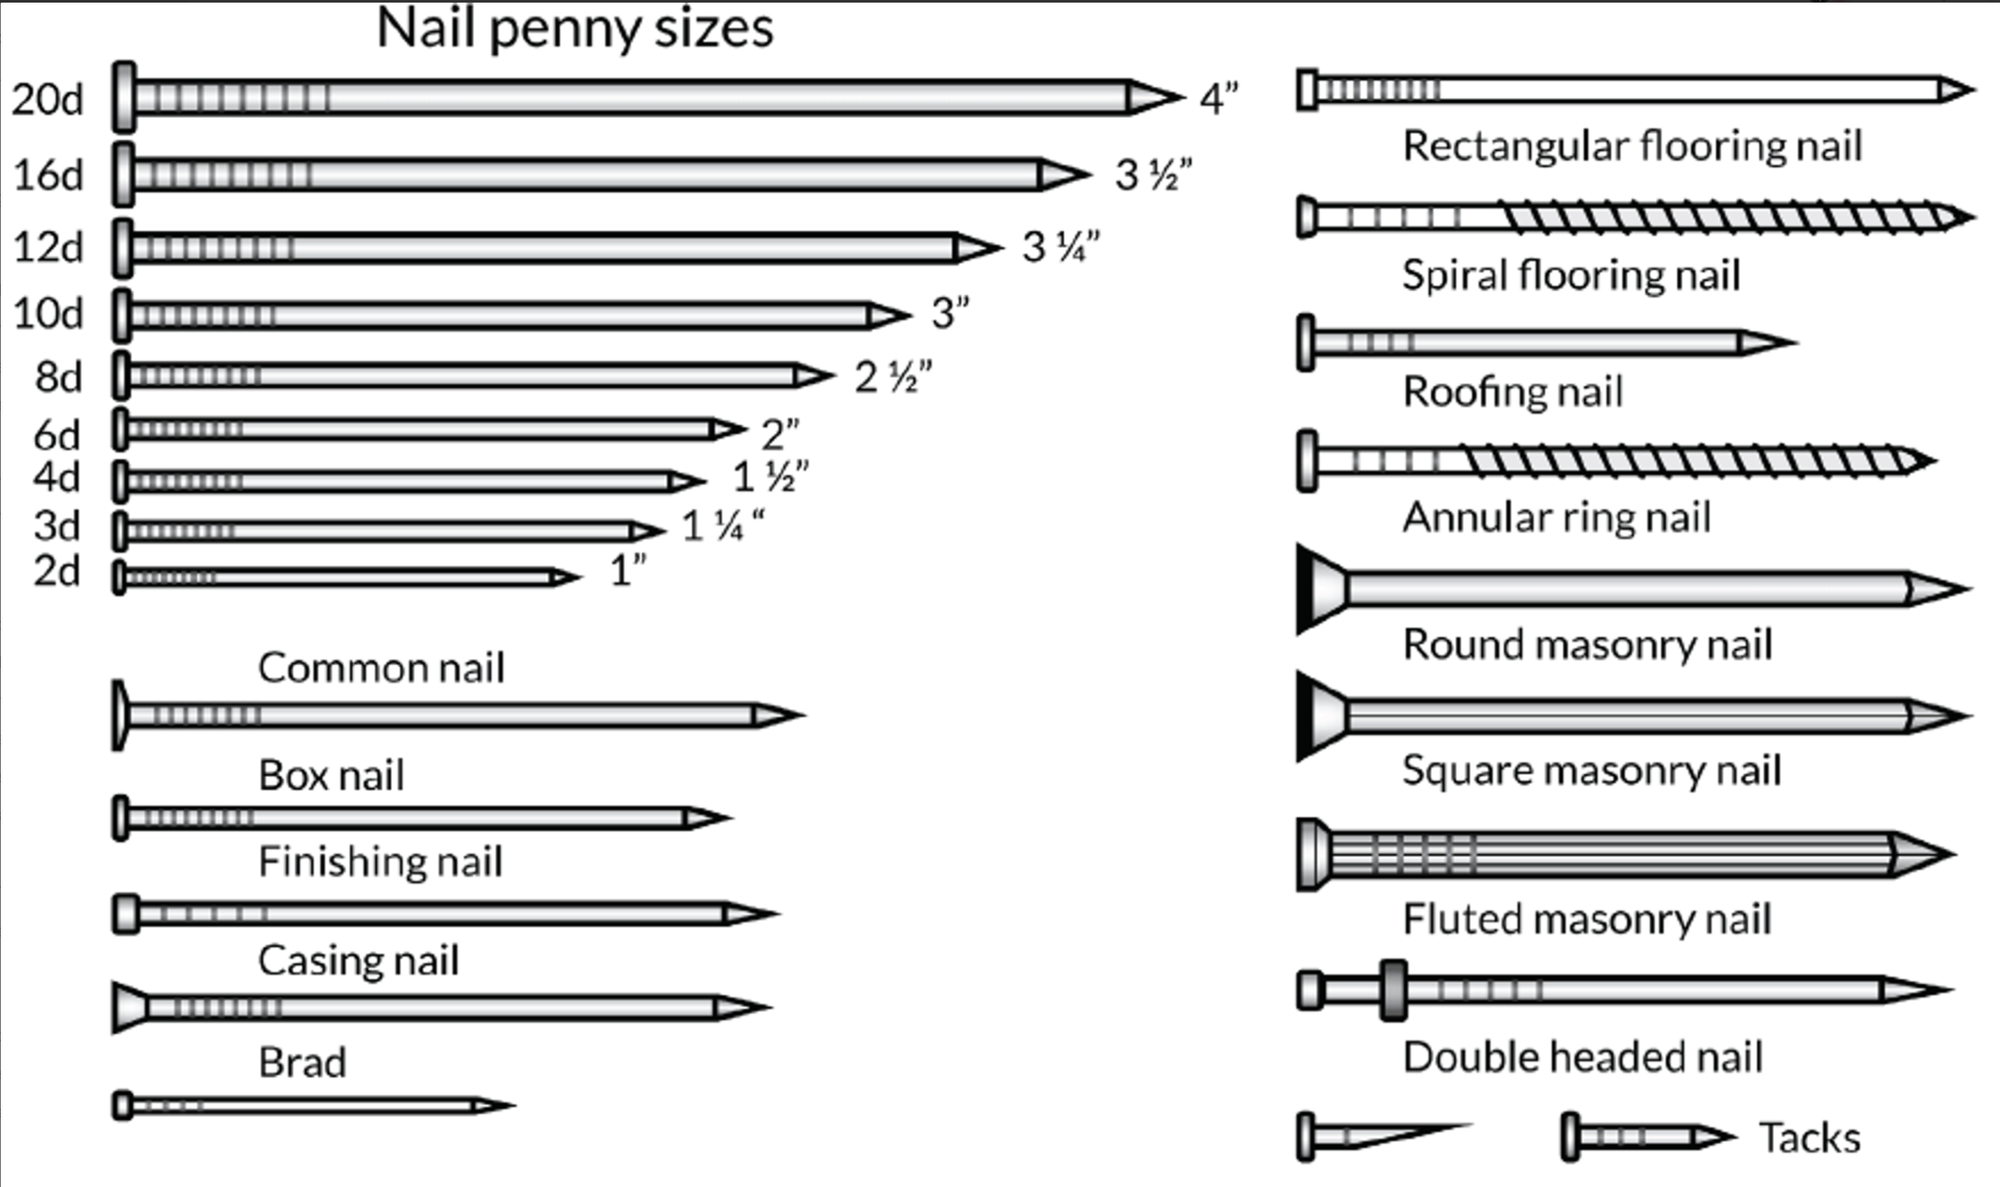
Here are some of the most frequently used types of nails:
- Common nails are typically applied to medium to heavy-duty construction projects. They are distinguished by a large head that can be effortlessly hammered into tough materials. These nails are usually crafted from wire, cut to the appropriate length, and are available in sizes ranging from 2d to 60d.
- Box nails have a smaller diameter and lighter weight compared to common nails. They are typically used for light construction tasks and home use.
- Finishing nails are generally lighter than common nails and are easily identifiable due to their small nail heads. They are often used for the installation of panelling, achieving a neat, smooth finish where the nail heads can be concealed.
- Roofing nails are primarily used in galvanized roofing installations. They have a much larger nail head compared to common nails, which prevents rainwater leakage and damage to asphalt shingles.
- Drywall nails are often ring-shaped and have a straight head. These annular-ring nails have sharp ridges along the nail shaft, providing a larger fastening capability.
- Masonry nails are typically used to fix concrete and concrete block. They come in round, square, and fluted types. Masonry nails are not recommended for use where high strength is required. Fixing to brick, stone or reinforced concrete should be done with screws or lag bolts.
- Tacks are available in both round and cut forms and are used to attach carpet or fabric to wood. Special upholstery tacks often have decorative heads.
- Corrugated fasteners, also known as wiggly nails, are used for light-duty fixing where strength is not a requirement. Mounting fasteners are generally set at a right angle to the joints.
Room Dimensions
Rooms intended for occupancy, restrooms, laundry facilities, and corridors should all have a ceiling height of no less than 7 feet. Dwellings and communal living spaces should contain at least one room with a minimum size of 120 square feet. For all other rooms, excluding the kitchen, a minimum size of 70 square feet is required.
Each habitable room, with the exception of the kitchen, must have a minimum dimension (either length or width) of 7 feet. The dimensions of nooks and entrances may fall below 7 feet, however, these areas should not be included when determining the minimum room size. For kitchens, a clear passage of at least 3 feet between counter-fronts and walls is required.
Panel Wall Sheathing
Nails or other acceptable fastening methods should be used to attach the structural wood panel, ensuring the nail heads are flush with the surface and do not cause fractures. If the nail heads of more than 20% of the fasteners exceed 1/8 inch beyond the surface, additional fasteners should be used to meet the necessary shear capacity. In situations where the nail spacing is tight and additional fasteners risk splitting the framing members, a certified engineer will need to provide specific correction instructions.
Fasteners should be driven a minimum of 3/8 inch from the edge of the panel, spaced 6 inches on center (o.c.) along the panel edge. Note that some shearwalls may require closer nail spacing. Support in the form of framing members or blocking should be present at the edges for all braced wall panels and shearwalls.
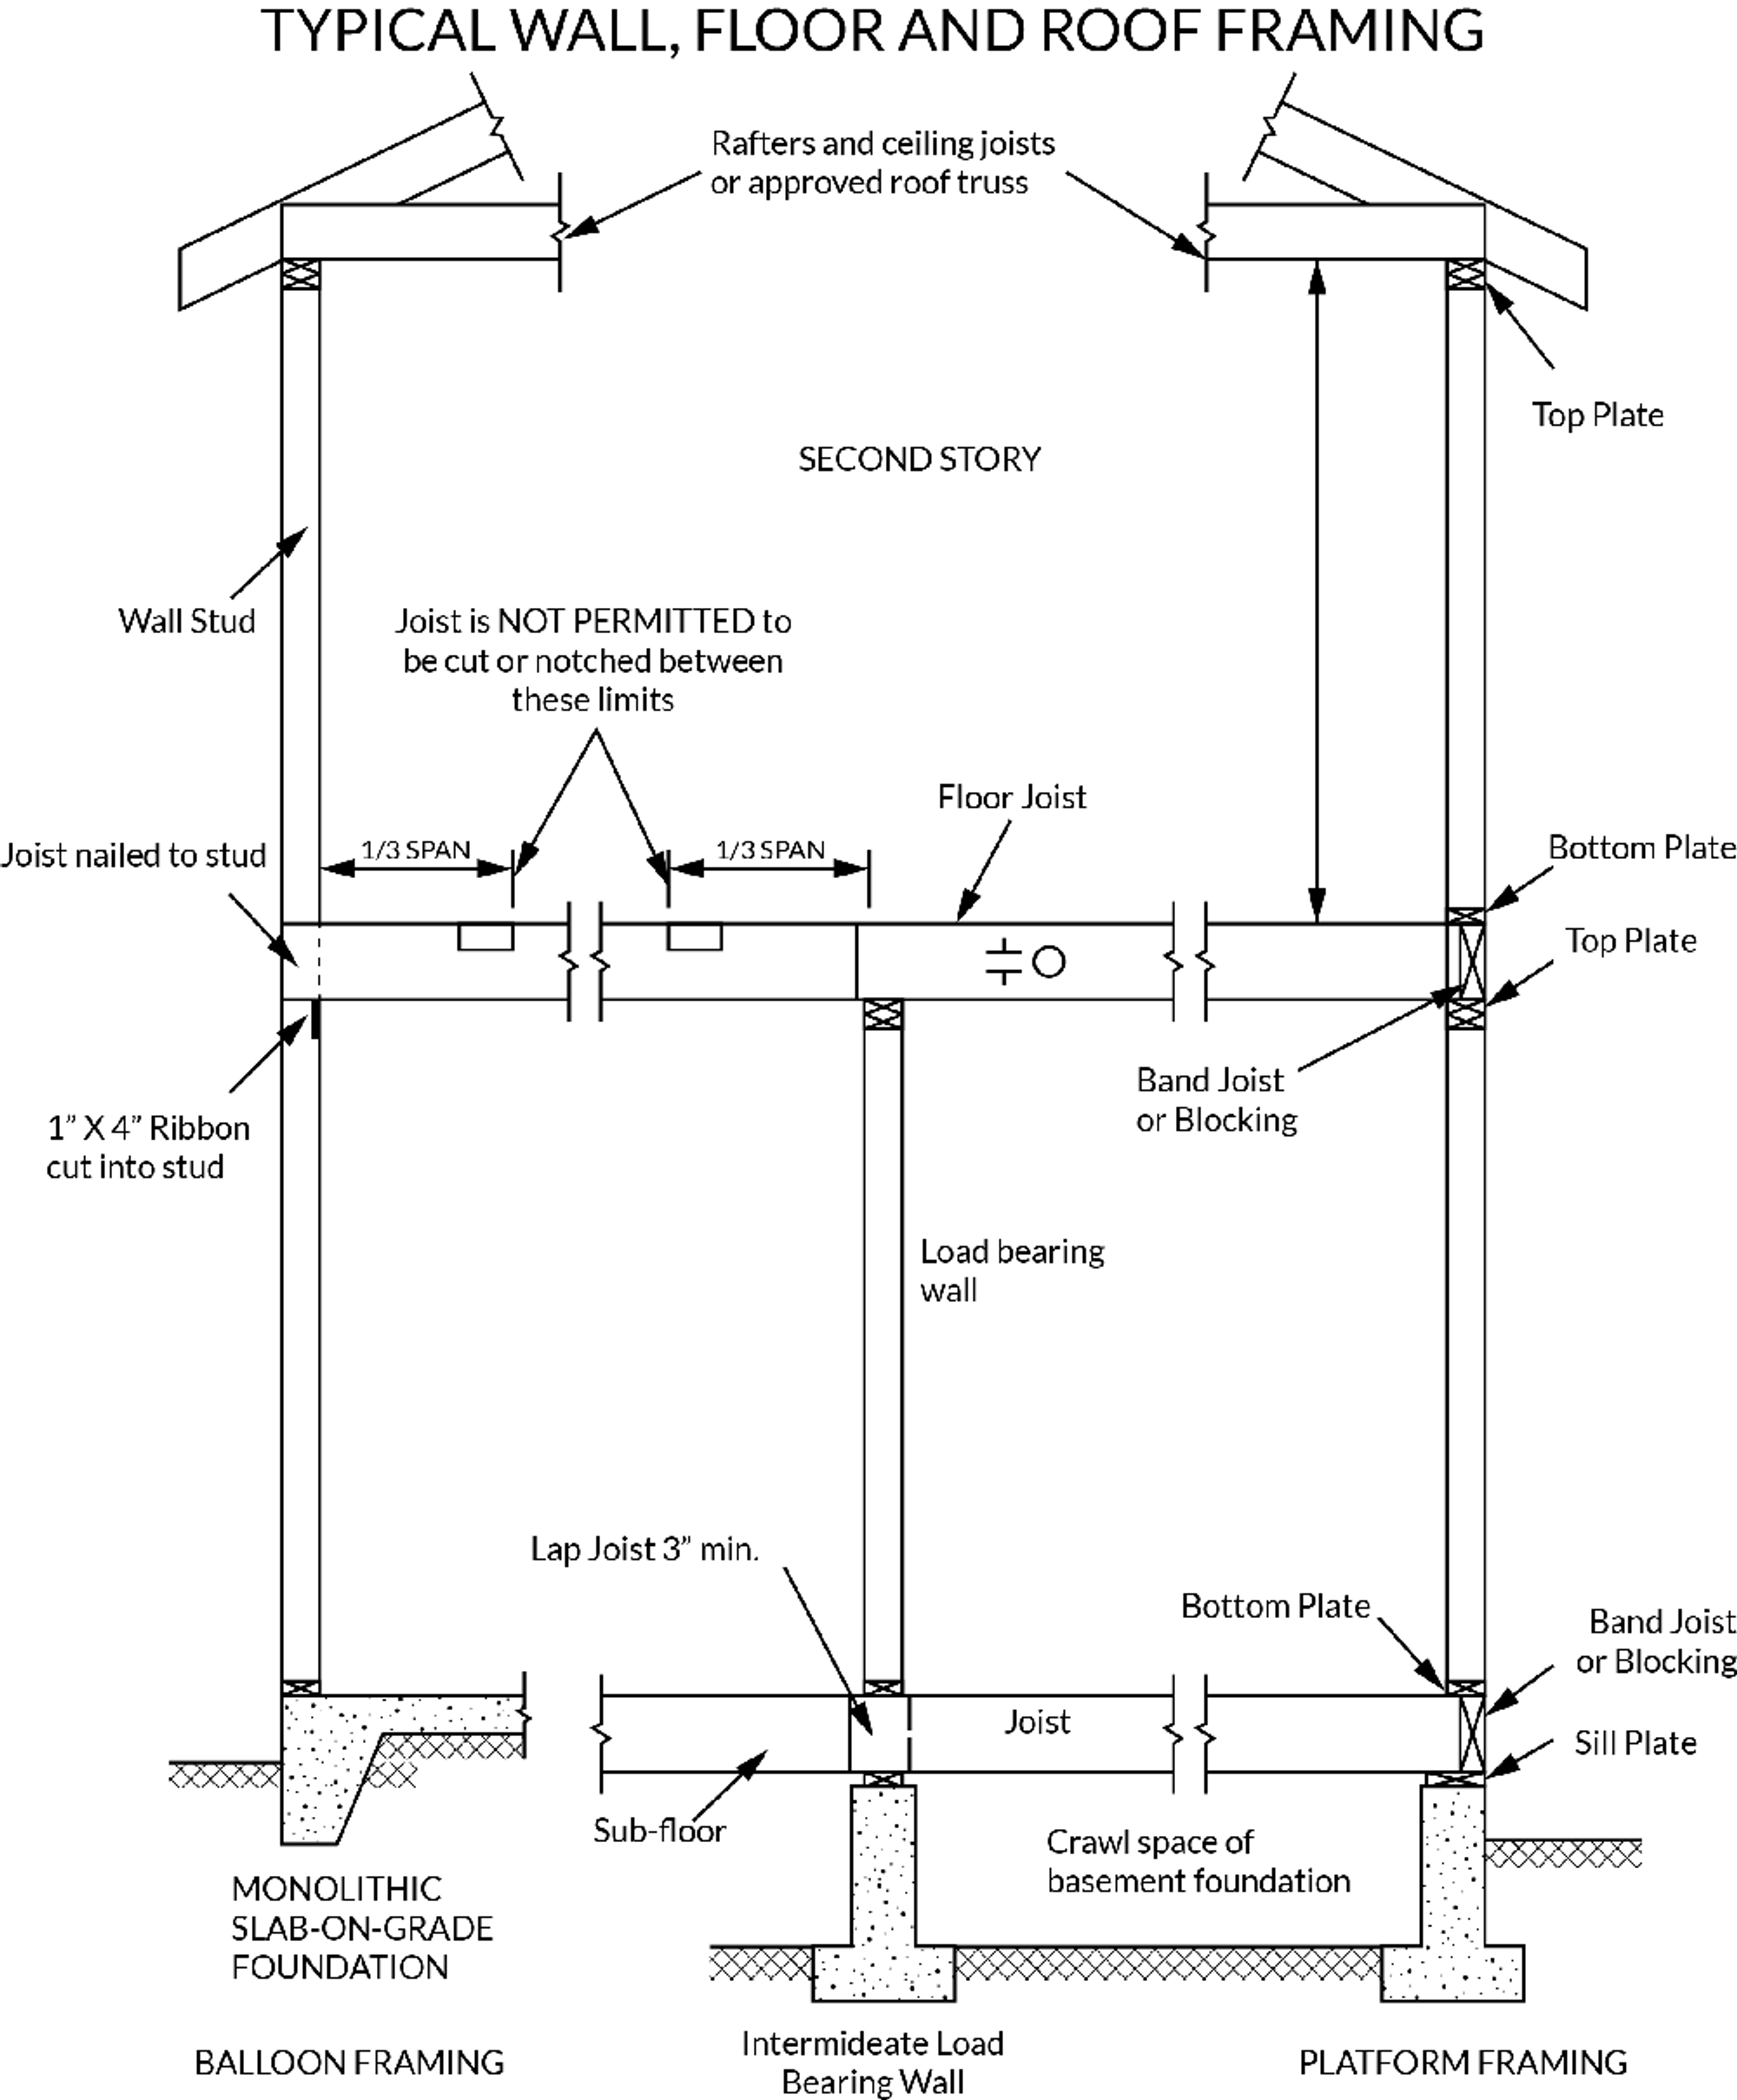
The below image provides examples of typical wall, floor and roof framing.
Floor Joists, Girders and Posts
The use of pressure treated wood for the floor assembly, girders, posts, subfloor, and joists becomes necessary under the following circumstances:
- When the wooden floor joists or structural floors without joists are less than 18 inches from the exposed ground;
- When the wooden girders are less than 12 inches from the ground.
It is essential to ensure that the bottom of the posts supporting the girders is elevated at least 6 inches from the ground unless they are pressure treated, as commonly seen with piers. Girders should be secured with a metal bracket or strap of adequate strength to prevent girder splices. For the ends of each joist, a wood or metal bearing of 1-1/2 inches should be available, and if the joists bear directly on concrete or masonry, this bearing should be at least 3 inches.
You need to use solid 2X (nominal) blocking over all bearing points and at the ends of joists. However, if the ends of the joists are nailed to a header or rim joist, you can omit blocking.
The joist frame should overlap by 3 inches or more on opposite sides of any beam, partition or girder. This opposite side of any beam, partition or girder can be securely tied in place. Blocking does not require this overlap.
The trimmer and header joists at the openings must be doubled when the header span is more than 4 feet.
Underfloor Ventilation
The underfloor ventilation requirements are similar to those for the attic, providing 1 sq ft of opening for each 150 sq ft of underfloor area. Use corrosion-resistant wire mesh with 1/8 inch openings. The underfloor access opening should be at least 18x24 inches.
Subflooring
The plywood for the subfloor should be nailed 6 inches o.c. in the center, and 12 inches o.c. on intermediate supports. The thickness required for the plywood used for the subfloor will depend on the joist spacing and the plywood panel index. All plywood flooring edges should be supported with blocking or should have tongue and groove joints.
Notching and Drilling
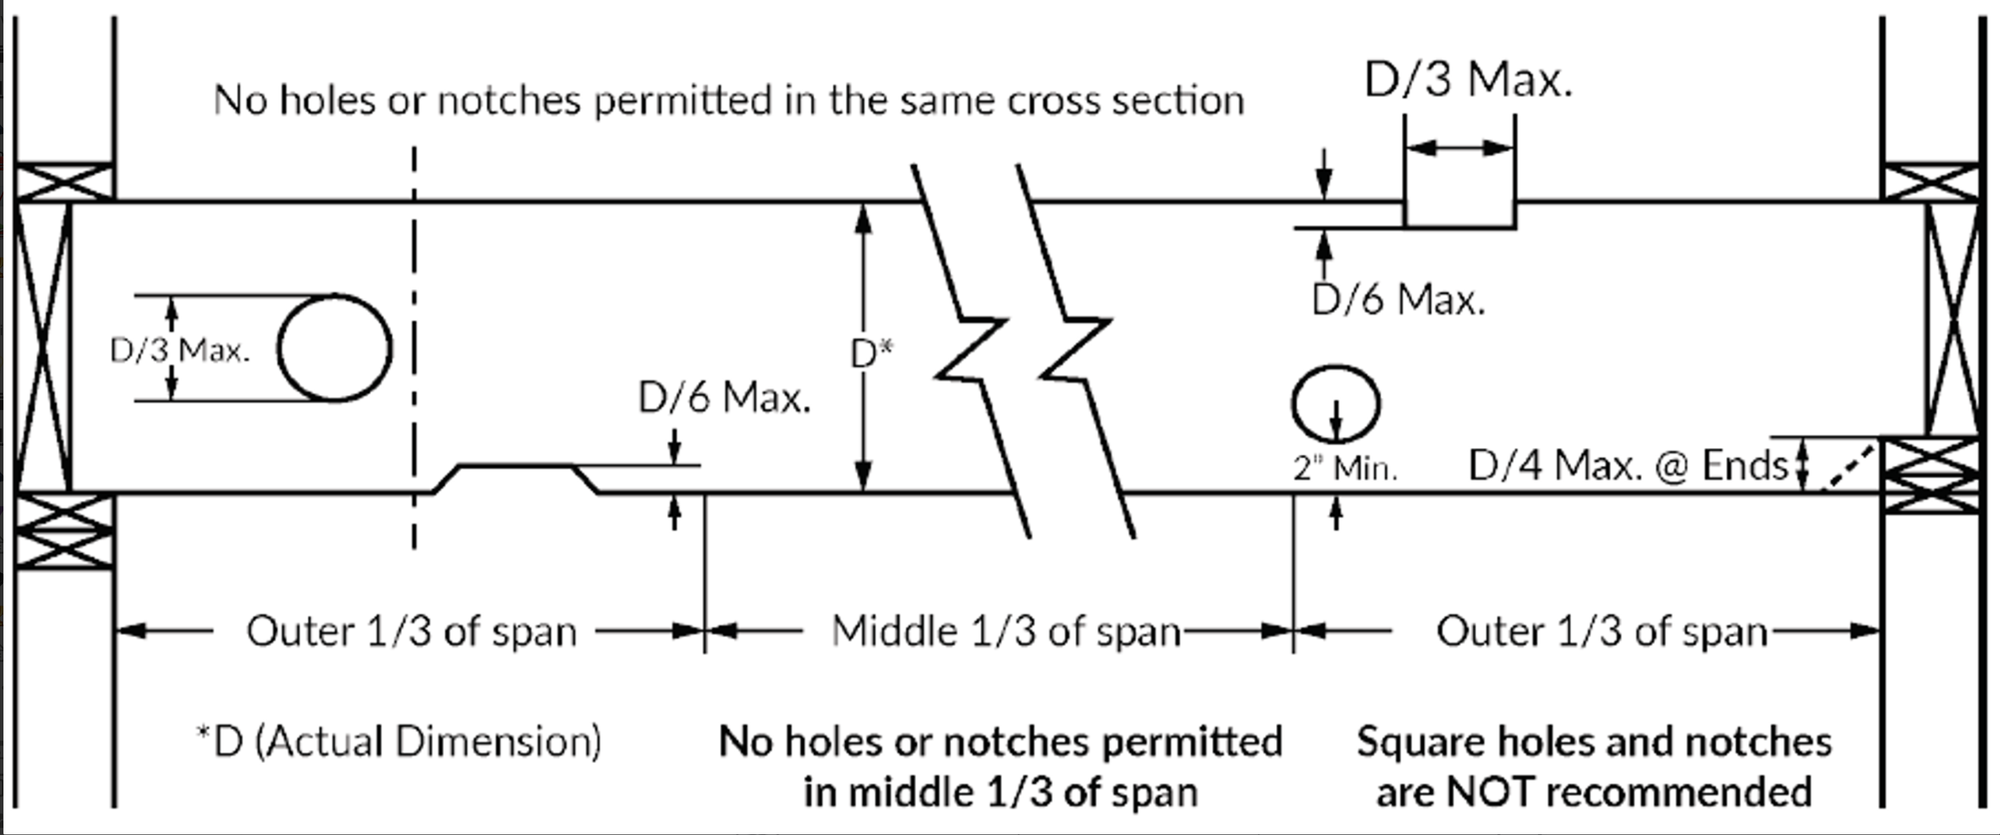
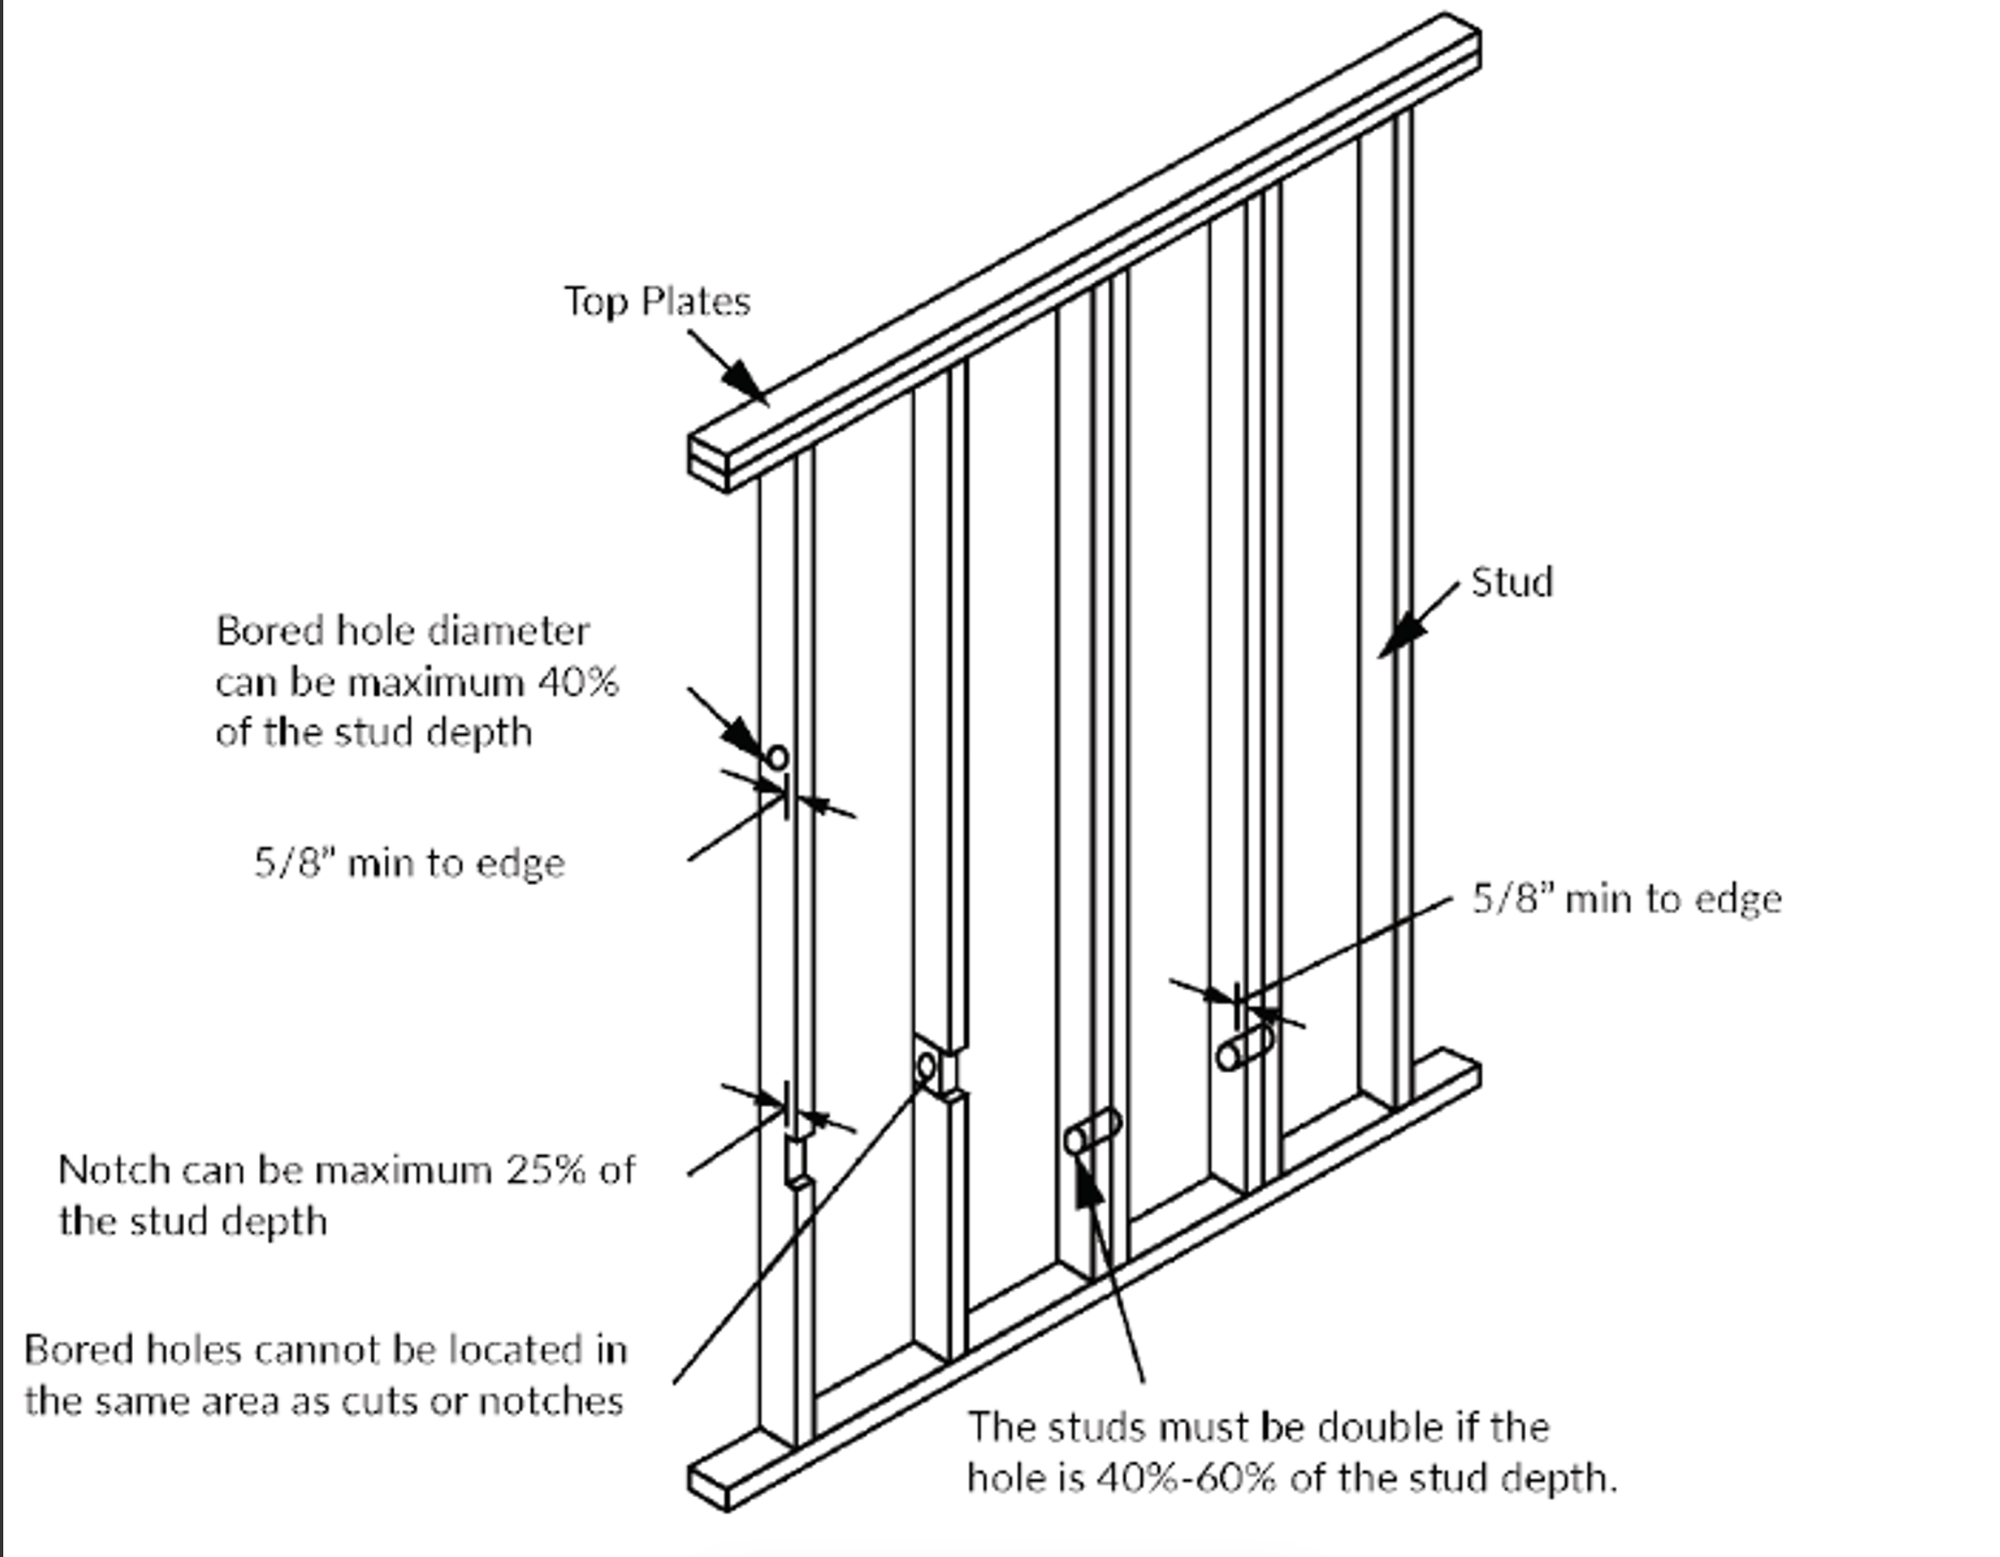
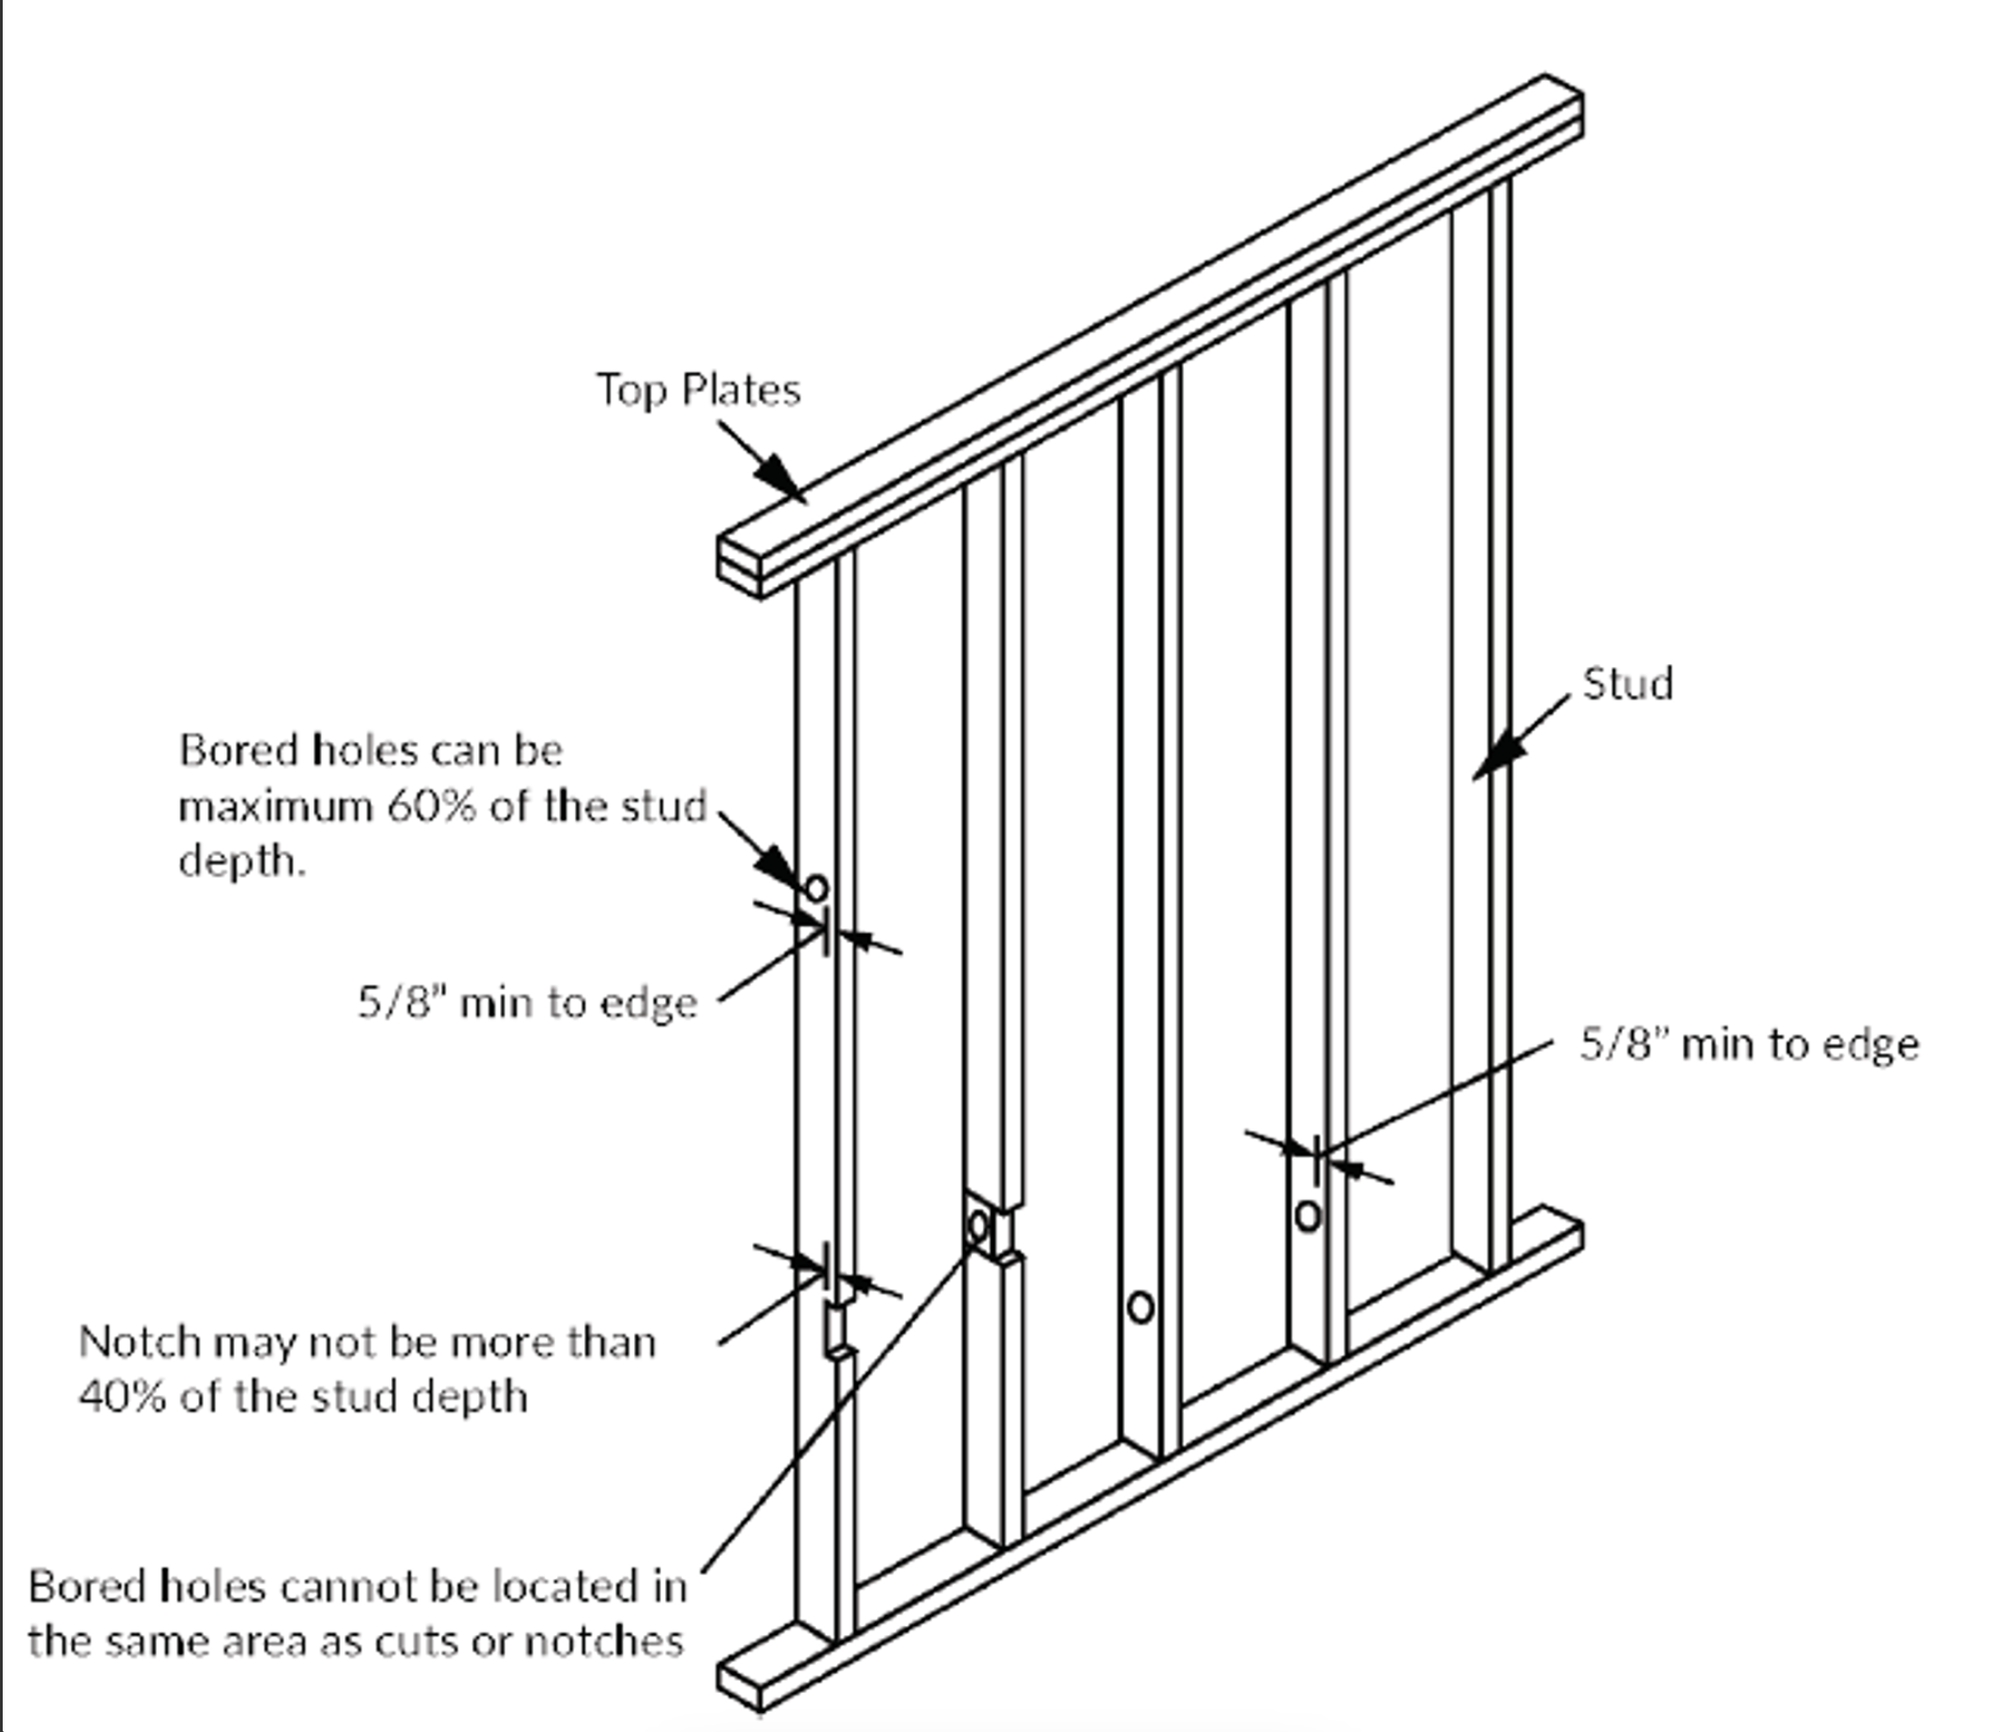
When making notches in the joists, the notch should not be deeper than 1/4 of the depth of the joist, to maintain the structural integrity of the joist. This ratio can be increased to 40% for an interior nonbearing wall. Additional notches in the top or the bottom of joists should not be deeper than 1/6 of the joist depth and cannot be located in the middle third of the joist span, as shown in the below images
If any holes are bored in the joists, they should not be bored within 2 inches of the bottom or top of the joist. The hole diameter should not be more than 1/3 of the depth of the joist.
Stairways and Landings
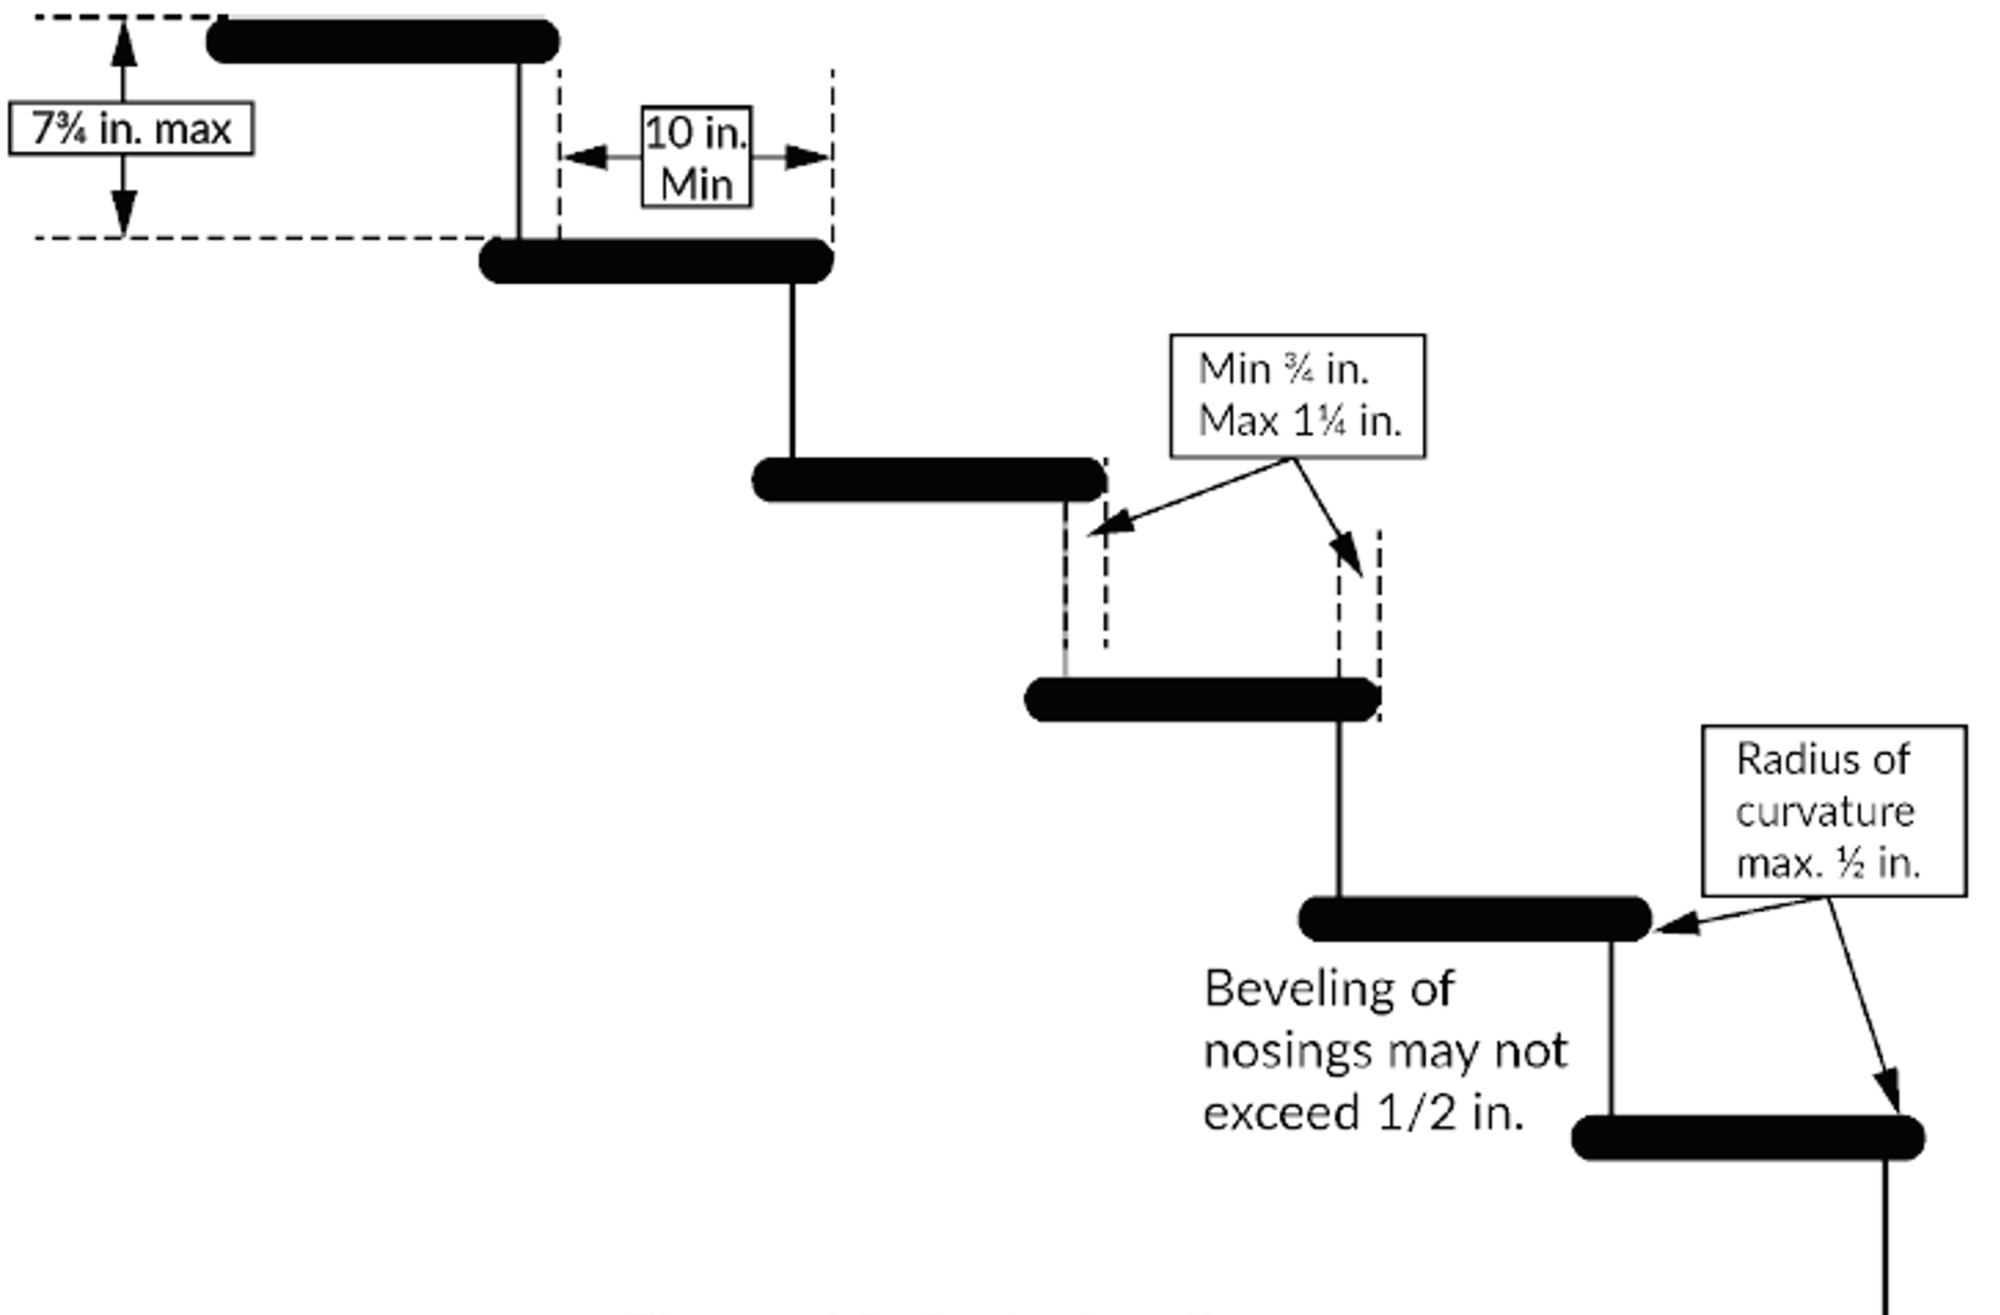
Staircases within private residences need to maintain a minimum width of 36 inches. Trims and handrails should not reduce this width by more than 4-1/2 inches. Every step should have a maximum rise of 7-3/4 inches, and a minimum rise of 4 inches with a run of at least 10 inches. If the stairs do not have a nosing, the minimum tread depth should be 11 inches. In any flight of stairs, the difference between the largest and smallest tread width or riser height should not be more than 3/8 inch. For stairways with solid risers having a tread depth less than 11 inches, a nosing of at least 3/4 inches but no more than 1-1/4 inches should be provided. The leading edge of the stair tread should have a maximum radius of curvature of 1/2 inch. Residential stairs can have open risers as long as a 4-inch sphere cannot pass through the opening. Refer to Figure 19 for these measurements visualized.
The headroom clearance for every staircase should be a minimum of 6 ft. 8 inches, measured vertically from the nosing of the tread to the horizontal surface above. Any enclosed usable space beneath the stairs should be safeguarded with 1-hour fire-rated construction.
The main outer door should have a landing right outside. This landing should be as wide as the door itself and at least 36 inches long in the direction of travel. The landing should not be more than 7-3/4 inches below the level of the interior floor.
If an indoor door is at the top of a staircase, a landing at the top of the stairs is not necessary, provided the door swings away from the stairs.
Handrails
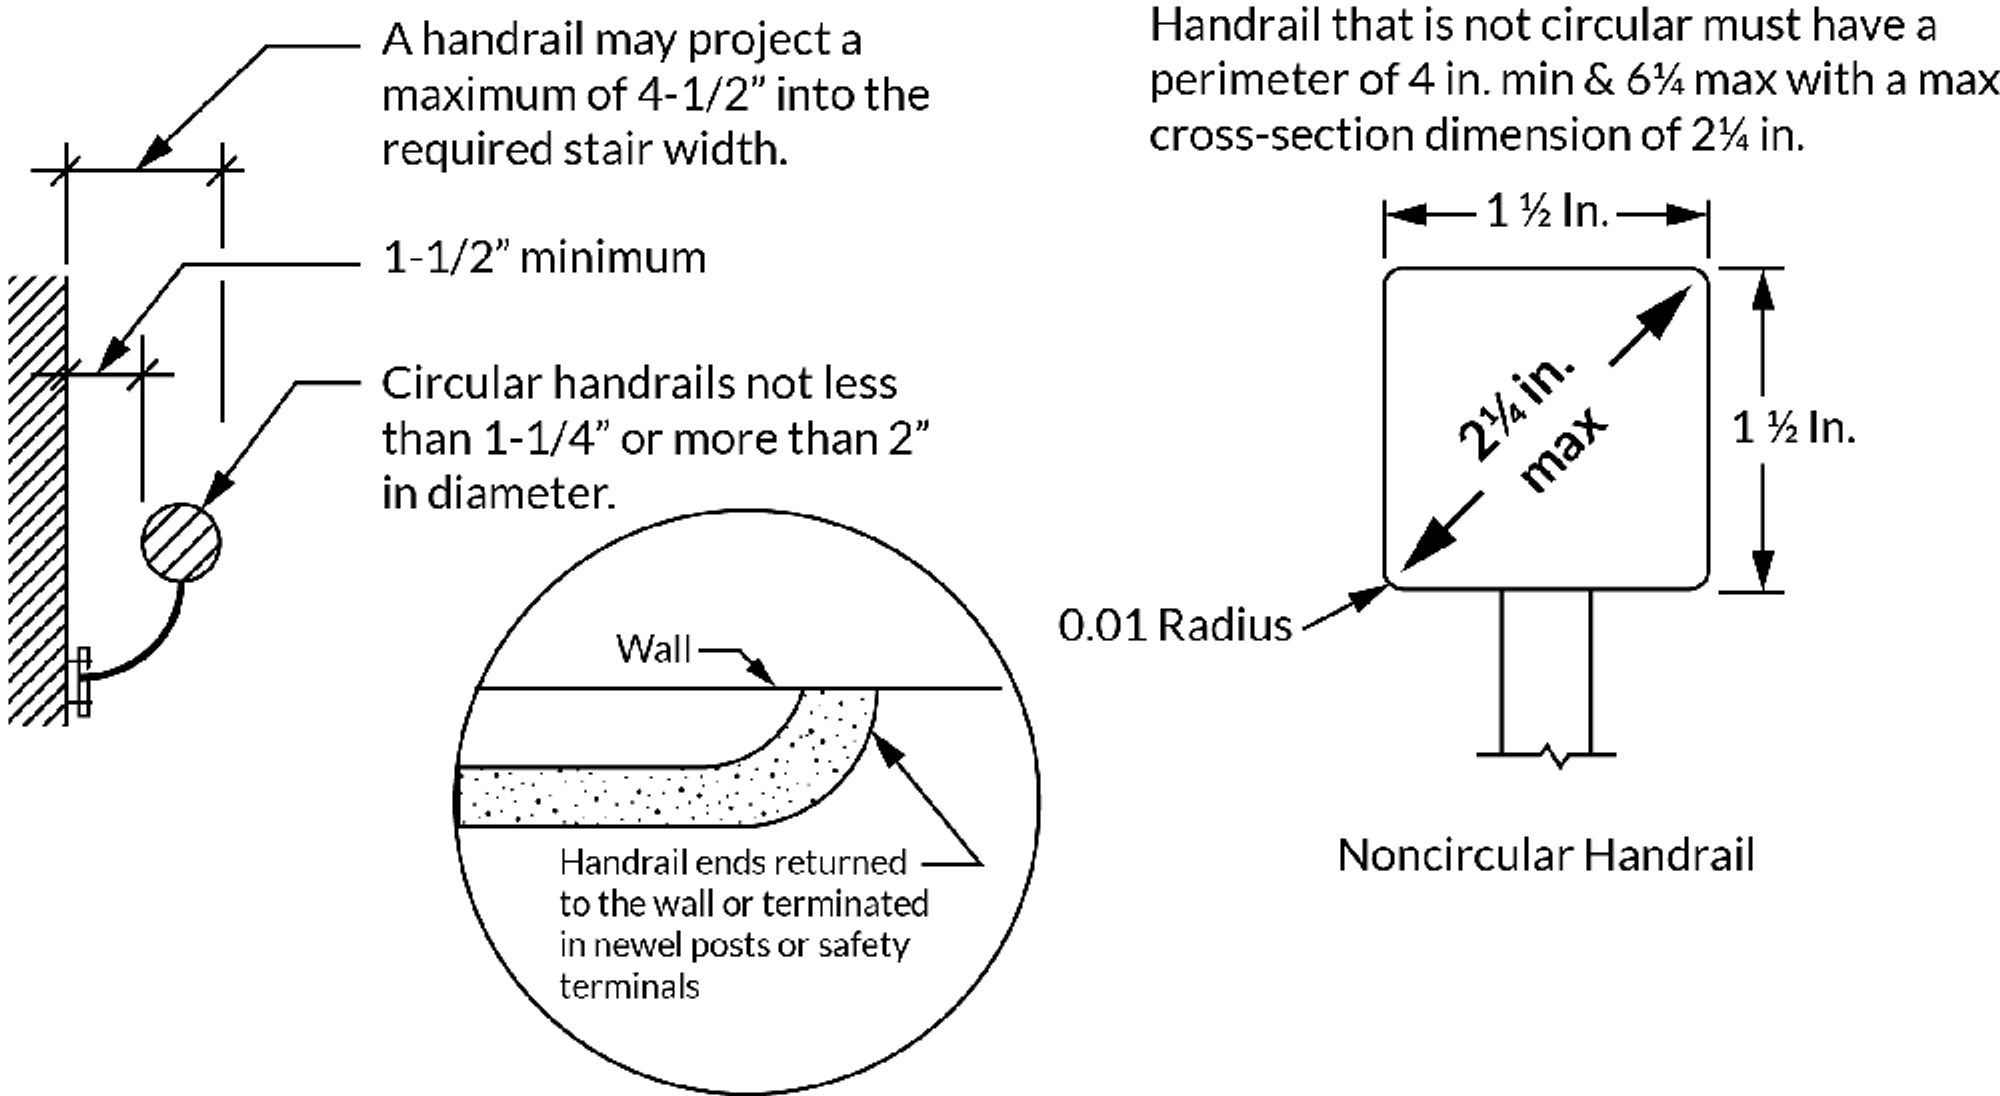
Handrails serve as a safety feature for stairways, offering support to those ascending or descending the stairs. In a residential unit, a handrail is mandatory if the staircase has more than four steps. The handrail, when it extends from a wall, should maintain a space of at least 1-1/2 inches between the handrail and the wall. The height of the handrail should be between 34 and 38 inches from the step's front edge. The end of the handrail should either be rounded or have a return bend. The gripping surface of the handrail should be at least 1-1/4 inches but not more than 2 inches in diameter, providing a consistent grip along its length. Refer to below image for visual aid.
Handrail Measurement Guide
Handrails should offer a smooth gripping surface without any sharp edges. For non-rounded handrails, the boundary should be at least 4 inches but not more than 6 1/4 inches with a cross-sectional dimension of 2 1/4 inches.
Guards
Guards serve as protective barriers at the edge of any horizontal surface to prevent falls. They are required on the open sides of stairways, landings, ramps, balconies, decks, or porches that are 30 inches or more above the ground level.
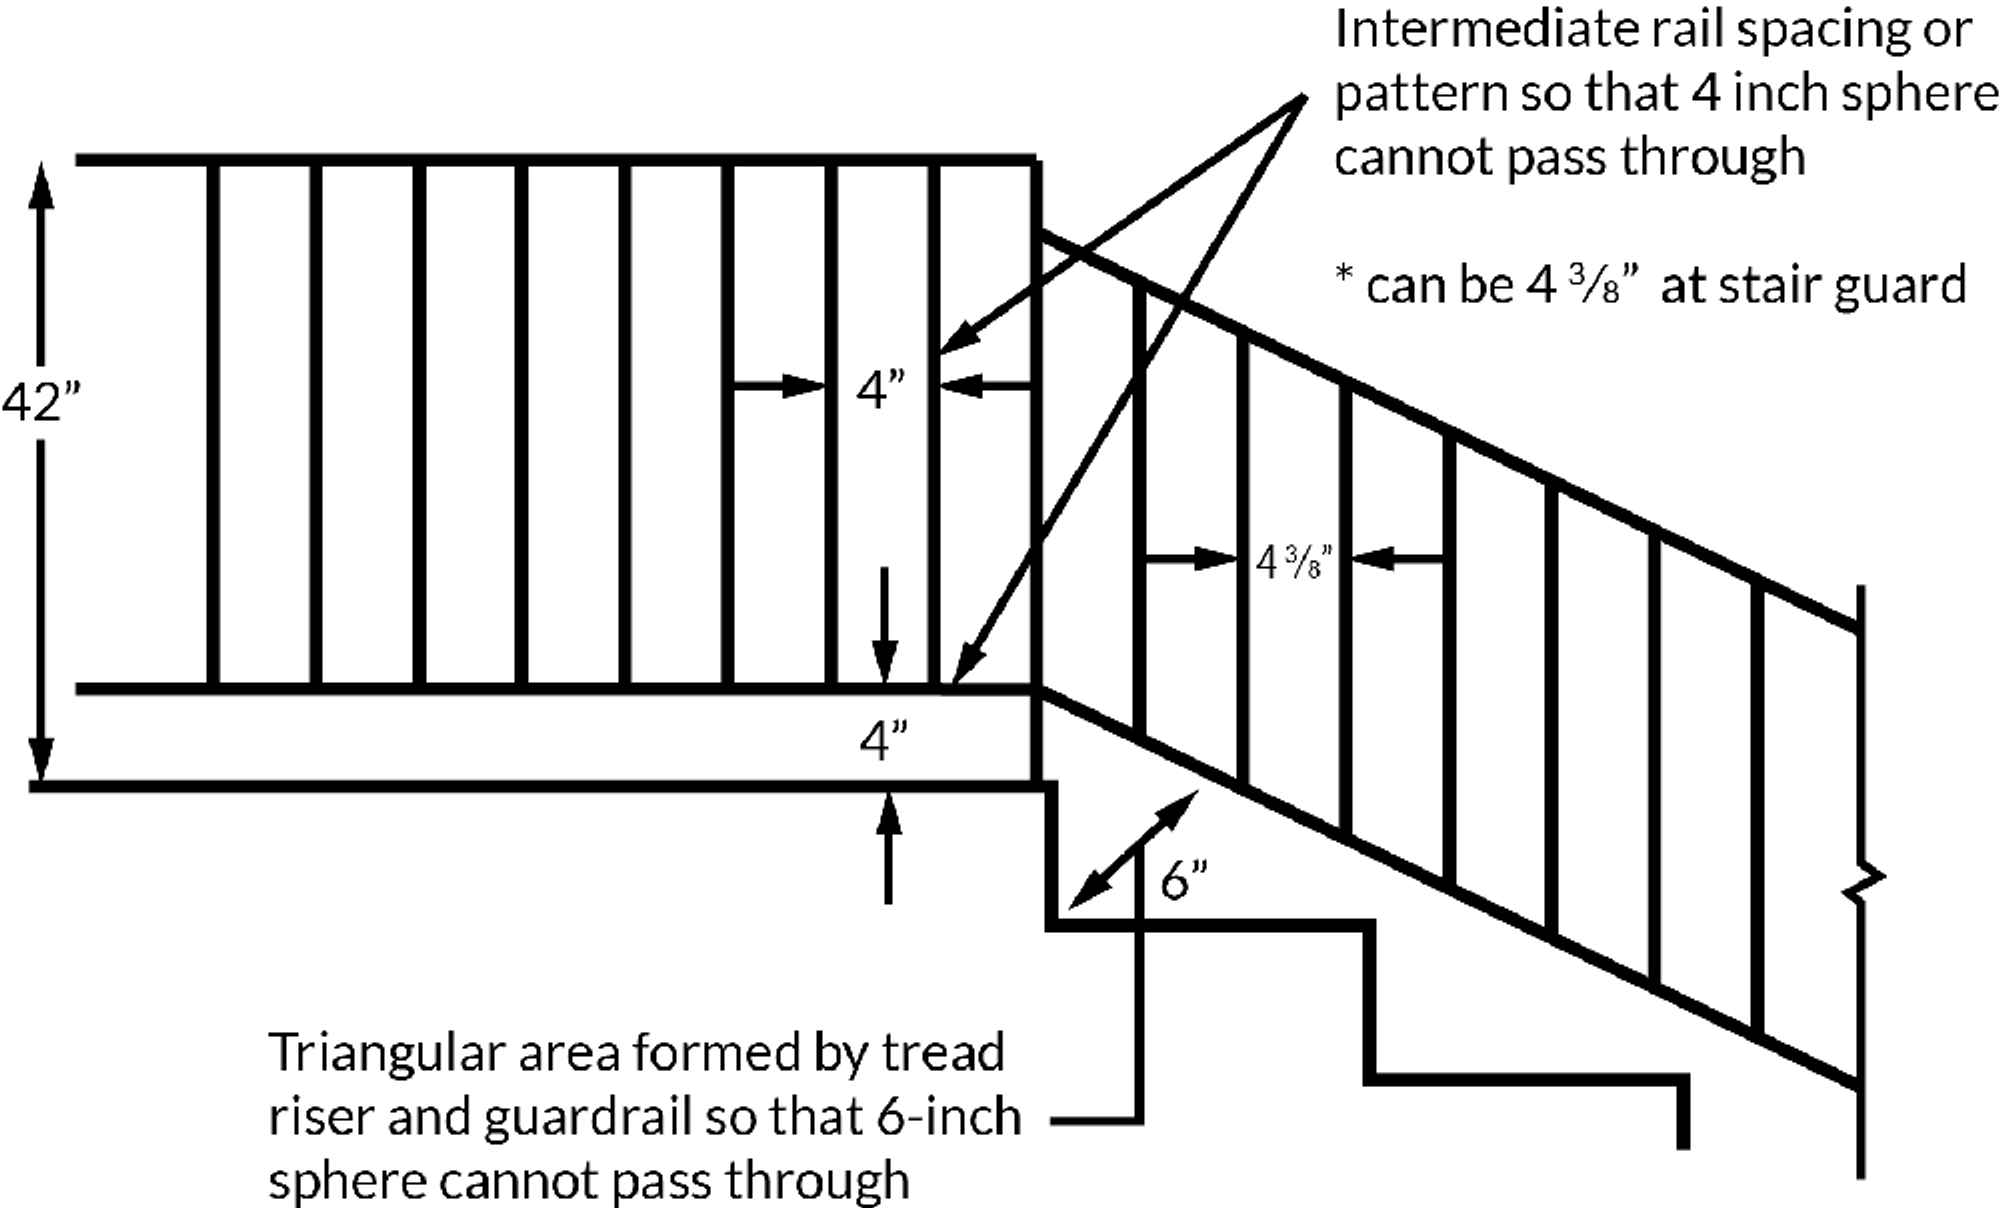
Residential guardrails need to maintain a minimum height of 42 inches from the surface. The design of the guardrails should include middle rails or ornamental patterns that prevent a 4-inch diameter object from passing through. Furthermore, a 6-inch spherical object should not be able to pass through the triangular openings that are formed by the riser, tread and the bottom part of a guardrail at the open side of a stairway. The openings on the sides of stair treads should be spaced to prevent a 4-3/8 inch sphere from passing through. Refer to the below image for a visual reference.
Guardrails
Wall Framing
Sill Plates
The base of the wall framing is formed by the sill or sole plate, which serves as the anchor for the studs. A sill plate, which typically sits directly on the foundation, needs to be securely fastened to the foundation with bolts. The sill plate should have a minimum nominal thickness of 2 inches and be wide enough to fully support the studs above.
Common practice recommends the use of a polyethylene sill sealer (or sill gasket membrane), about 1/4 inch thick. This sill-sealer is attached to the underside of the sill plate, creating a barrier that blocks air leaks and fills any rough spots in the slab. The sill-sealer also acts as a barrier against moisture migrating from the concrete to the wood.
Studs
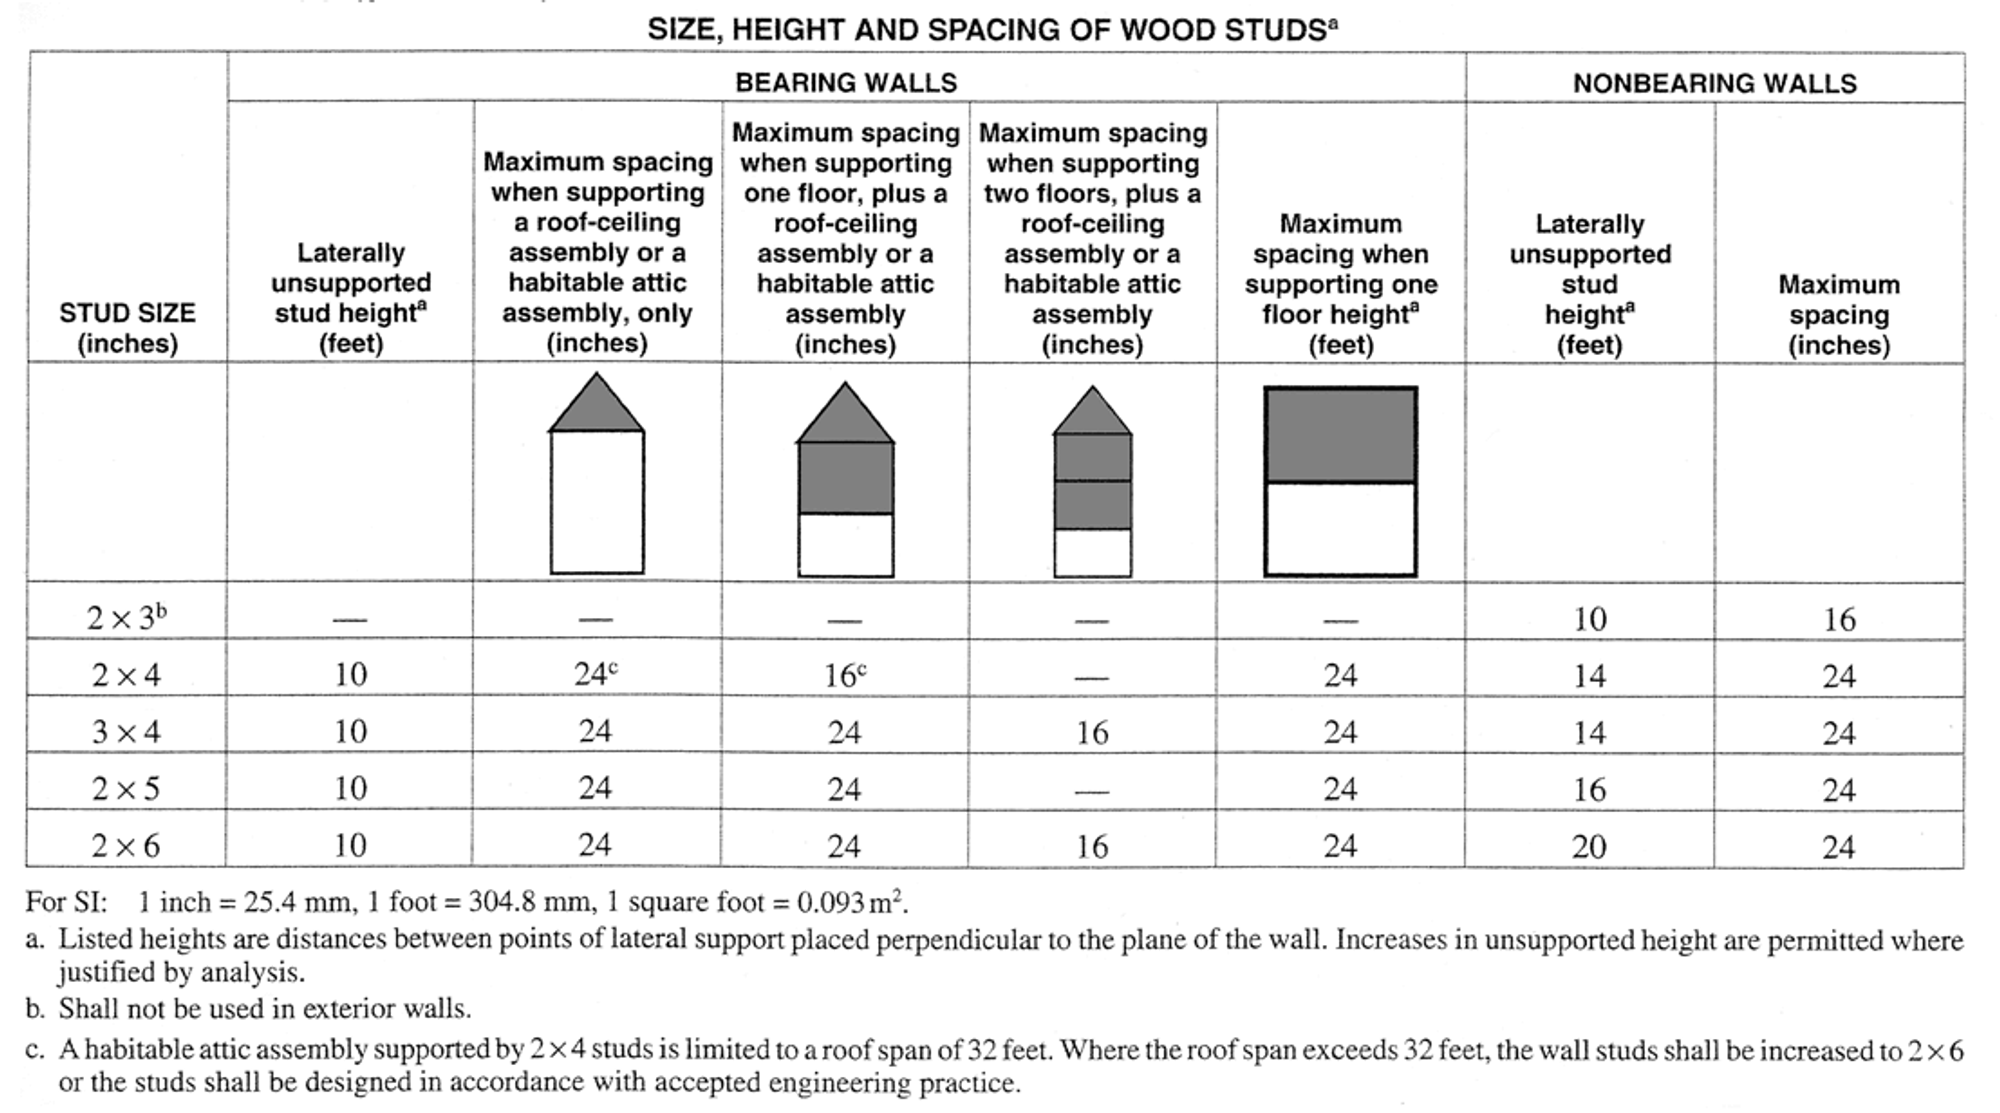
Studs should be installed with their widest face perpendicular to the wall, protruding outward. In all exterior wall corners, three studs should be used. For bearing walls, the maximum unsupported height for studs is 10 feet. Acceptable dimensions are 2x4, 2x5, 2x6 and 3x4 inches.
The typical stud used in residential construction is 2x4 inches. These 2x4 studs can be placed 24 inches apart on center (o.c.) if they are only supporting the roof and ceiling. In a 2-story building where studs also support a floor, they should be spaced 16 inches o.c. However, for either a 1- or 2-story building, if a 3x4 or 2x6 stud is used, then the studs can be spaced 24 inches o.c. The use of 2x4 studs is not allowed in a 3-story building, but 3x4 or 2x6 studs spaced 16 inches o.c. are permitted. Refer to the below for stud size and spacing requirements for different structures.
Size Height and Spacing of Wood Studs
Top Plates
Every load-bearing and exterior wall should be equipped with a double top plate. Additionally, double top plates should cap the wall studs on the exterior, overlapping at corners and where they intersect with other walls. The end joints in the double top plate should be staggered by no less than 4 feet. The overlap junction must be secured with at least 8 – 16d nails.
Cripple Walls
The framing of foundation cripple walls should employ studs that are not smaller than the studs above them and should be at least 14 inches in length, or solid blocking can be used instead. For seismic categories D or E, if the height of the studs in the cripple walls exceeds 14 inches, they should be treated as a level in a single or multi-story building and should be braced following braced wall line standards.
Headers
Headers, which are support components positioned at the top of doors and windows perpendicular to the adjacent studs (refer to the below figure), should have a minimum thickness of 2 inches and a width that matches the nearby wall studs. However, it's typical to see 2x6 inch headers used. Should the opening exceed 8 feet in width, the headers should be doubled.
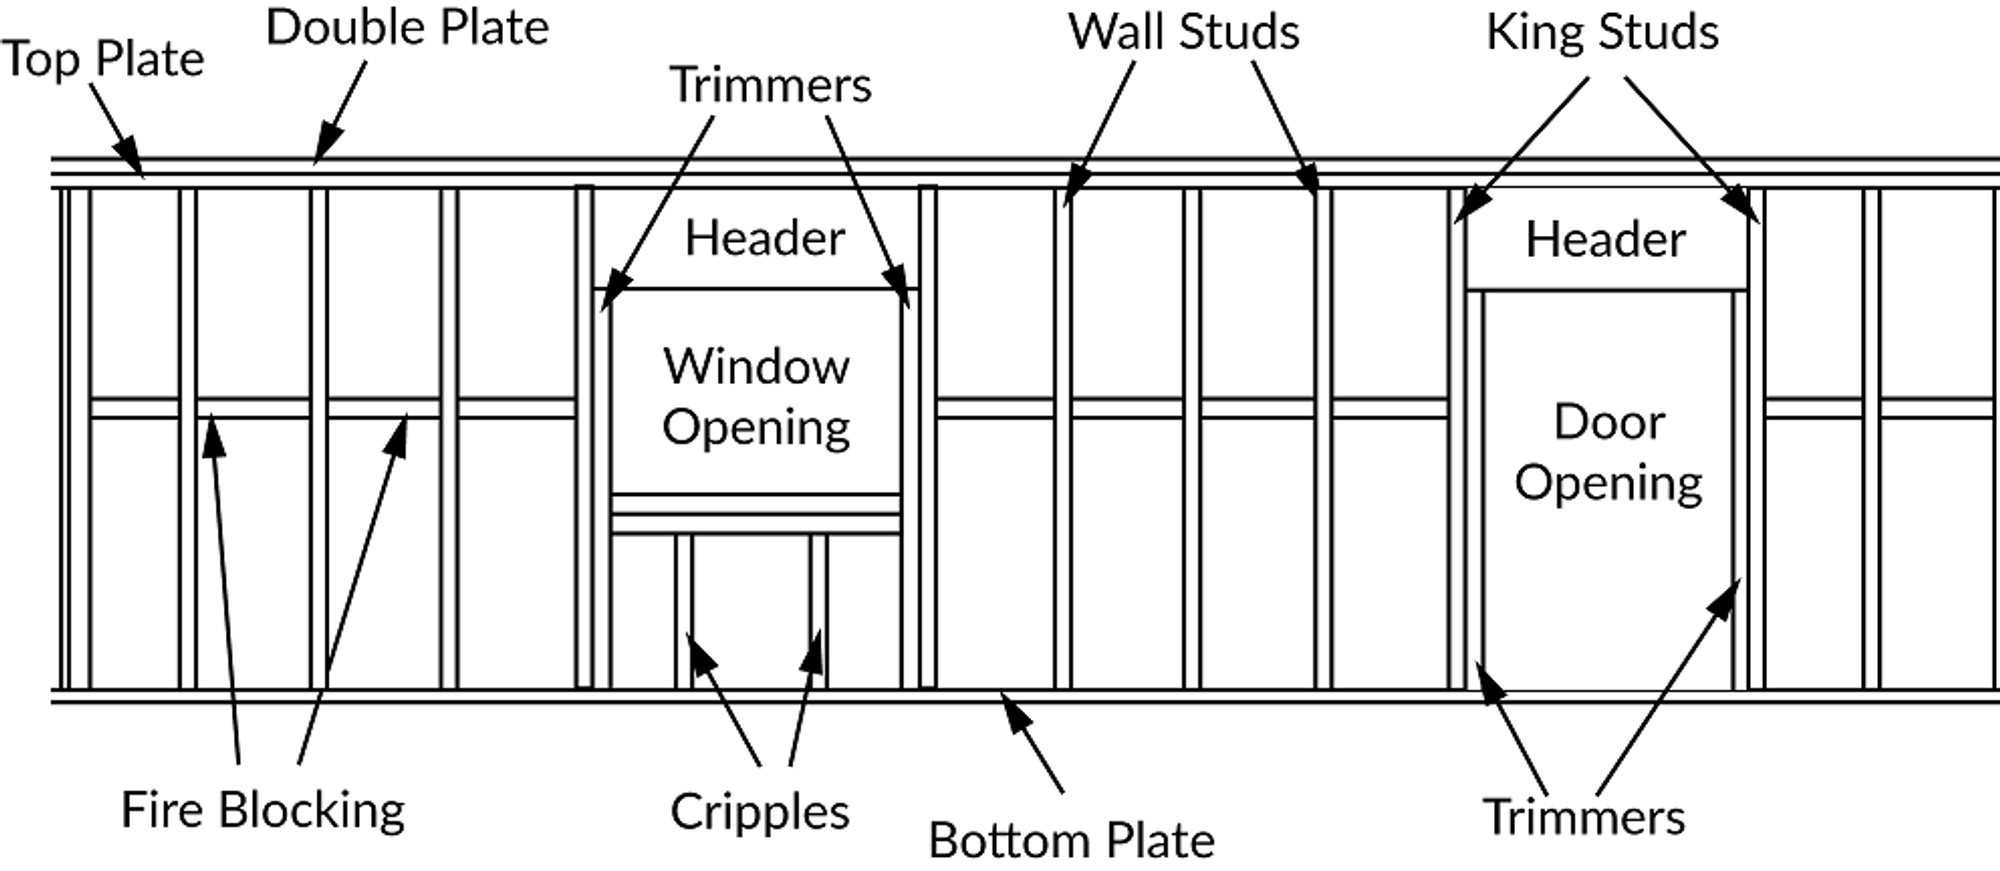
Wall Studs and Headers.
Fire Blocking
Every wall that goes from the floor to the ceiling necessitates fire blocking. The gap between each vertical stud should not exceed 10 feet. Fire blocking is also needed if a ceiling does not reach the top plate of a wall. Any openings, such as those for pipes, need to be filled with materials that are not combustible. When using insulation batts as fire blockers in between studs, they must be fastened to the wall studs.
